Overall, I think the project has gone really well.
The final video has come out extremely well, and I as well as the rest of the group as very pleased with it.
The only thing that I would say that was disappointing was because the renders kept freezing, as the deadline approached we had to lower the quality of the superspray effect, and as feedback suggested in the presentation, it now looks like 'porridge' being emitted from the plane.
Other than that I am really confident that the animation is entertaining and features some good, original ideas.
I really did think that some of the other groups had really strong ideas, such as the road that showed lots of signs with a rollercoaster goin overhead and a voice over. That one stood out as it was in a way connected to ours in the way that it was a custom little 'world'.
More Sound
Finally, we needed a sound for the falling letters of text for each model. This was going to be a hard one, because its not a realistic sound, at least there is no obvious answer. I mixed a thud with a heavily processed gong to give a metallic feel to the thud of a landing object.
Yet another new effect was included; the filtered ringing effect, this muffled the sound slightly, but kept the pure metallic bounce to the clip.
Clips mixed in found at:
http://www.freesound.org/samplesViewSingle.php?id=16793
http://www.freesound.org/samplesViewSingle.php?id=18447
I did also share some bird sounds to give more of an environment to the piece, they were recorded for a module last year by myself in my back garden, and so are totally original.
Further Sound Editing
A mix was needed for the rayfire effect; one that sounded like a collapsing building. I created a mix and threw some effects of some more audio clips found at:
http://www.freesound.org/samplesViewSingle.php?id=99197
http://www.freesound.org/samplesViewSingle.php?id=77074
http://www.freesound.org/samplesViewSingle.php?id=51123
http://www.freesound.org/samplesViewSingle.php?id=25014
http://www.freesound.org/samplesViewSingle.php?id=80450
Low pass is becoming a favourite of mine! I also tried a reverb effect on one clip; Convolution reverb, which worked quite nicely. Here are some screens of the Soundbooth file in motion:
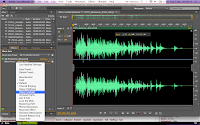
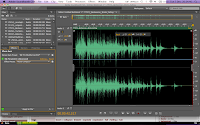

It was edited further to remove the metallic squeal at the beginning.
http://www.freesound.org/samplesViewSingle.php?id=99197
http://www.freesound.org/samplesViewSingle.php?id=77074
http://www.freesound.org/samplesViewSingle.php?id=51123
http://www.freesound.org/samplesViewSingle.php?id=25014
http://www.freesound.org/samplesViewSingle.php?id=80450
Low pass is becoming a favourite of mine! I also tried a reverb effect on one clip; Convolution reverb, which worked quite nicely. Here are some screens of the Soundbooth file in motion:


It was edited further to remove the metallic squeal at the beginning.
Final Adjustments And Contributions
With other group members being much more confident and capable when it comes to lighting, after generating ideas for camera pans and angles of flight etc, my model has been handed over to the 'professionals'.
Another main reason for this is that the hardware available to the other member(s) is much more powerful and able to render the work, whereas my MacBook Pro freezes every 5 minutes....
But no, I cannot sit back and relax, I have attempted to continue to contribute by continually asking if there is anything I can do.
Examples of such little tasks may be setting up the superspray effect on the final MAX file which has then been sent back and rendered, and locating a sound file for my jet model.
This was found at:
http://www.freesound.org/samplesViewSingle.php?id=40625
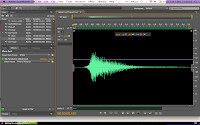
I then imported this downloaded file into Soundbooth and put some envelopes on the beginning and the end to really emphasise the stark nature of the quick passing of the jet.
Other modifications that were made were adding distortion, changing the pitch of the clip by +1.5 to just make it sound that much more realistic, and also for another module I had to 'muffle' a sound, and after experimenting with this I found it worked quite well.
The Low Pass Effect really worked wonders on the clip and makes it sound really life-like.
Another main reason for this is that the hardware available to the other member(s) is much more powerful and able to render the work, whereas my MacBook Pro freezes every 5 minutes....
But no, I cannot sit back and relax, I have attempted to continue to contribute by continually asking if there is anything I can do.
Examples of such little tasks may be setting up the superspray effect on the final MAX file which has then been sent back and rendered, and locating a sound file for my jet model.
This was found at:
http://www.freesound.org/samplesViewSingle.php?id=40625
I then imported this downloaded file into Soundbooth and put some envelopes on the beginning and the end to really emphasise the stark nature of the quick passing of the jet.
Other modifications that were made were adding distortion, changing the pitch of the clip by +1.5 to just make it sound that much more realistic, and also for another module I had to 'muffle' a sound, and after experimenting with this I found it worked quite well.
The Low Pass Effect really worked wonders on the clip and makes it sound really life-like.
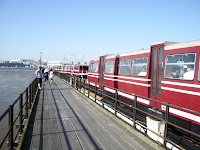
Pier Test 2
Here is another test of the pier, that did not crash!!!! Yey! The only problem is I left it on overnight so I don't know how long it took; it was about halfway after 50 mins I believe, but it slows down as the sea and pier comes into the shot.
Initial Plane Flight 1
This video will have a moving gizmo for the sphere so it looks like the ground is whizzing past beneath the plane. The lighting for this scene looks rather nifty so I may not alter that. These clips will need slowing down in premiere pro, they seem alright on blogspot, but they play very quickly in VLC.
The camera goes a bit funny in the middle, so that will need looking at, and the sea material hasn' t rendered, a common problem of mine. But this 45MB scene doesn't crash every 5 mins like the previous 135MB scene did! MAX can just about manage the amount of objects on screen as well, instead of resorting to the wireframing constantly.
Initial Render
All parameters have been set to mental ray, the materials for the plane have been finalised (as much as they can be, all I need is the globe material, a background image and lighting, but this initial render shows the cut of the plane taking off.
I will explain why it's in reverse. The idea for this scene was, with input from another group member, to have the rayfire tool incorporated into this shot (obviously it would be closer, this shot is too far away) and as that tool collapses the object, I would want to reverse the whole scene in premiere pro to give the illusion it was being constructed and then taking off.
Upon reflection of this test, it would be better to have a close 'cut' of the plane being constructed from a reverse of the rayfire, and then cut to this test of the takeoff.
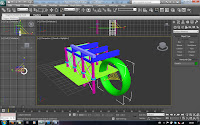
Plane Rayfire Test 1
Here it is, the first test of the plane with the rayfire tool. It crashed about 3 times before it actually worked, but it did in the end. There is work to be done, such as sorting out the pieces falling through the runway, not over the edge but through it!
But for a first attempt, it looks promising. I might have the box coming up from beneath the plane and try that, rather than crushing the plane down to the runway. It might be worth just seeing how it turns out...
Rayfire Test
It was surprisingly easy to use! I thought there would be many parameters, especially if it was anything like the superspray that I have had to try and figure out, but it was a case of follwing a simple tutorial to get some great results.
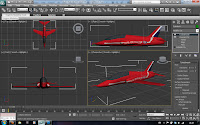
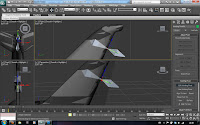
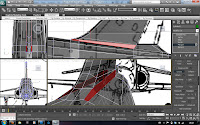
Smoke Effects Testing
Here are some test videos I created for the Smoke Trail that will be emitted from the rear of the plane.
I would like to point out that this is a new skill for me. This completely new territory was discovered upon wondering if smoke would be possible. There was a plugin that could be used (Afterburn), but that requires purchasing (or if you're more naughty, a crack) but I was not prepared to do this, especially when the Super-spray particle emitter came to light.
The first just shows a basic super spray effect with some simple parameters, just to get an idea of what this particle creation looks like.
The second was an experiment to see if the effect could be used in motion. This is essential for my plane if smoke is to be emitted from the rear as it in in real life.
The third shows another experiment, the red arrows have coloured smoke; would mine have to be bog-standard grey or could I make it realistic? This video shows the three colours.
These renders (especially the last one) froze, and the render was not completed, but packaged correctly when cancelled. They give a good representation of the super spray effect, but it is worrying that the renders have frozen, I need complete renders if I choreograph the scenes.
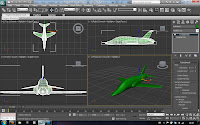
Plane Materials Attempt 2
Members of my group have given me feedback on my pier and plane, and I have had suggestions on how to improve the texture which I will now implement.
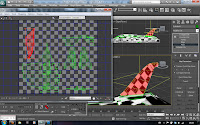
Going back to the untextured version of the plane I saved, I detached each of the different entities and dealt with them seperately. The RGB value (found in photoshop) of the red was used for the wings and tail wings and the majority of the body. For the engines I used a bitmap image and assigned a UVW map (planar) to position it accurately, and angled it slightly to make the white stripes line up with polygons so I could simply assign them a different ID and therefore different material.
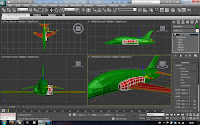
Once all textures were applied, including the stripe on the tail which was also using a Bitmap / UVW Map, I realised that when moved, my objects are still all detached, and so when I move my plane's body, the other parts don't follow. I simply attached them and had to redo all the assigning materials and uvw maps because for some reason all this information is lost. At least the materials are all ready to use!
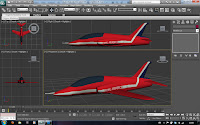
And above is the final plane.
Going back to the untextured version of the plane I saved, I detached each of the different entities and dealt with them seperately. The RGB value (found in photoshop) of the red was used for the wings and tail wings and the majority of the body. For the engines I used a bitmap image and assigned a UVW map (planar) to position it accurately, and angled it slightly to make the white stripes line up with polygons so I could simply assign them a different ID and therefore different material.


Once all textures were applied, including the stripe on the tail which was also using a Bitmap / UVW Map, I realised that when moved, my objects are still all detached, and so when I move my plane's body, the other parts don't follow. I simply attached them and had to redo all the assigning materials and uvw maps because for some reason all this information is lost. At least the materials are all ready to use!


And above is the final plane.
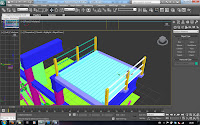
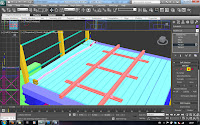
The Pier Construction Part 2


The Pier Construction Part 1
I have decided to leave the plane until I meet with the group tomorrow, and have started to construct the pier. Looking at the structure, it is a very repetitive entity (as expected) and I have created a cross-section which can be duplicated for the length of the pier.
I have created the framework for the structure of the pier by creating a lot of boxes and cylinders. I have made a plane for the sea which will be 'wavy', but for now it will just act as a static reference point.
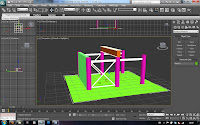
I have also used toruses (doughnut shapes) for detail in the framework, and used various features of max like extrude, bevel, clone, attach etc. to assist me, and converted some shapes into editable polygons for detail.
For detail of the pier, I have made wooden planks the length of the cross section, and hand rails, and then copied the whole entity across to provide a basis for the train tracks. This was lowered and widened, and one hand rail has been removed.
I have created the framework for the structure of the pier by creating a lot of boxes and cylinders. I have made a plane for the sea which will be 'wavy', but for now it will just act as a static reference point.


I have also used toruses (doughnut shapes) for detail in the framework, and used various features of max like extrude, bevel, clone, attach etc. to assist me, and converted some shapes into editable polygons for detail.

For detail of the pier, I have made wooden planks the length of the cross section, and hand rails, and then copied the whole entity across to provide a basis for the train tracks. This was lowered and widened, and one hand rail has been removed.


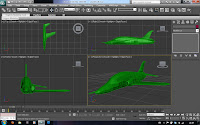
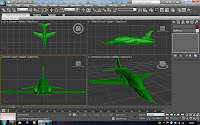
The Plane, Completed???
Here are some shots of the completed plane.
 (shot 2)
I had the intention to make flaps that would make the flight look realistic. I create some bones and altered the pivot of the flap so the angle was correct, but I cannot quite perfect this. If attached to the plane, the uvw map is destroyed.
It may be that if the flight is quick and the plane is far away, the plane will look realistic enough, even with the slight cavities in the tail and wings. I may just leave this, I'll ask the group.
Next up, the smoke...
 (shot 2)
I had the intention to make flaps that would make the flight look realistic. I create some bones and altered the pivot of the flap so the angle was correct, but I cannot quite perfect this. If attached to the plane, the uvw map is destroyed.

It may be that if the flight is quick and the plane is far away, the plane will look realistic enough, even with the slight cavities in the tail and wings. I may just leave this, I'll ask the group.
Next up, the smoke...
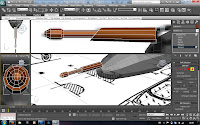
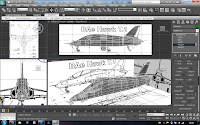
Plane Construction Part 5
To complete the plane, there are just two more steps: applying a material to make it look real, and having the 'flaps' on the wings and tail that help steer the plane.
I had an extreme amount of difficulty with the materials. To begin, i applied a chequered design to the object to see how the material wraps around the object. Unwrap UVW was used to try to make the tiles equally proportioned around the plane.
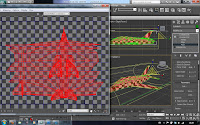
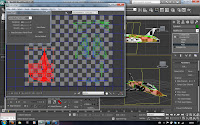
I finally arrived at something acceptable. Having selected the faces of the circular body, and seperated them from the mesh on the unwrap uvw map, i was able to identify individual portions of the mesh. On the wings, the tiles were still stretched but being totally red, I needn't have fixed this, it would only have been a waste of time. The tail however has a tri-stripe design on it, so this did need fixing. Identiying the seperate portion of the mesh and moving it to a different part of the bitmap (below) allowed me to see to this.
Applying a planar orientation to the tail faces has corrected the problem. I have then saved the actual material used as a compressed psd file and applied it to the mesh so I could see it updated regularly. I did have a few problems, such as the faces being overlapped and inverted, but after hours of playing I got nowhere. I decided to just settle for what I had, because I could just make the camera for the animation a tad further away and the plane move faster. As long as it looks sort of right...
I had an extreme amount of difficulty with the materials. To begin, i applied a chequered design to the object to see how the material wraps around the object. Unwrap UVW was used to try to make the tiles equally proportioned around the plane.


I finally arrived at something acceptable. Having selected the faces of the circular body, and seperated them from the mesh on the unwrap uvw map, i was able to identify individual portions of the mesh. On the wings, the tiles were still stretched but being totally red, I needn't have fixed this, it would only have been a waste of time. The tail however has a tri-stripe design on it, so this did need fixing. Identiying the seperate portion of the mesh and moving it to a different part of the bitmap (below) allowed me to see to this.


Applying a planar orientation to the tail faces has corrected the problem. I have then saved the actual material used as a compressed psd file and applied it to the mesh so I could see it updated regularly. I did have a few problems, such as the faces being overlapped and inverted, but after hours of playing I got nowhere. I decided to just settle for what I had, because I could just make the camera for the animation a tad further away and the plane move faster. As long as it looks sort of right...
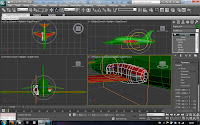
Plane Construction Part 4
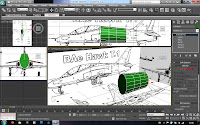
The final component is the "wing" protruding from the back of the aircraft, and this was created by manipulating a box in the same way the wing and tail was created.
Now all the components are there, I have attached the wing, the back 'wing' and the engine together (they are not connected to the plane body, only placed within them so they look attached, as is the gun emplacement on the front) and used the symmetry modifier to reflect these 3 components to the other side.
I also added a turbosmooth modifer to the mesh to see the final product.

Now all the components are there, I have attached the wing, the back 'wing' and the engine together (they are not connected to the plane body, only placed within them so they look attached, as is the gun emplacement on the front) and used the symmetry modifier to reflect these 3 components to the other side.


I also added a turbosmooth modifer to the mesh to see the final product.
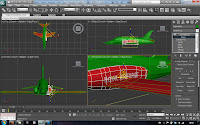
Plane Construction Part 3
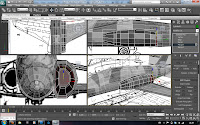
Next, I focused on what I assume to be a gun emplacement on the front of the nose. A cylinder was used and extruded in a similar fashion to creating the body. (To get the angled face about halfway along, when I extruded that face I rotated it, then bevelled the face to be able to extrude a smaller diametered circle from it).
Then it was onto the wings, where a box was created and manipulated in the same way the tail was. Following that, the engine was constructed by scaling a cylinder vertically, and then flattening the side closest to the body by manipulating polygons. This was hard to create because it was such a complex shape, and it does not quite match up (it is supposed to sort of mould into the actual body shape at the back, but in my model it does not, it still protrudes a tad) but this attention to detail is not a problem with this animation. I needn't spend time fixing this.


Then it was onto the wings, where a box was created and manipulated in the same way the tail was. Following that, the engine was constructed by scaling a cylinder vertically, and then flattening the side closest to the body by manipulating polygons. This was hard to create because it was such a complex shape, and it does not quite match up (it is supposed to sort of mould into the actual body shape at the back, but in my model it does not, it still protrudes a tad) but this attention to detail is not a problem with this animation. I needn't spend time fixing this.


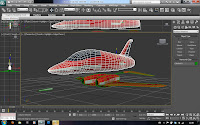
Plane Construction Part 2
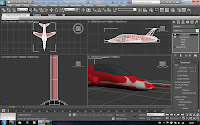
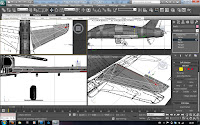
I have constructed the plane by simply creating a 1 polygon long cylinder and extruding each end and scaling the resulting elliptical shape to form the cylindrical body of the aircraft.
To create the tail, I simply created a box and moved each vertex (each corner from the side view) into place and then once again extruded the faces to form the rest of the shape.
When it was of a full form, I simply attached the two objects and then created polygons to physically attach the two. (I have previously moved and created vertices so the edges matched up).


To create the tail, I simply created a box and moved each vertex (each corner from the side view) into place and then once again extruded the faces to form the rest of the shape.


When it was of a full form, I simply attached the two objects and then created polygons to physically attach the two. (I have previously moved and created vertices so the edges matched up).

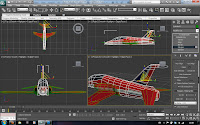
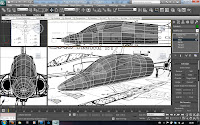
Plane Construction - Part 1
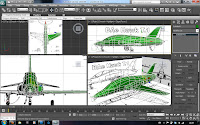
I have lined up all the blueprints to start the construction of the Hawk Aircraft.

Now on to the modelling!

Now on to the modelling!
The RAF
A central focus of my contribution to the animation is the Southend Air Show, a very popular attraction of Essex. This event attracts the attention of many, and features a deisplay from the red arrows.
Using the Red Arrows website (below), I have acquired the knowledge of the aircraft type they fly, and will now model this along with the pier. This will have to be the more detailed of the two models, as this element will be in the foreground.
http://www.raf.mod.uk/reds/behindthescenes/hawkaircraft.cfm
Below are some blueprints found which I will use for my guidelines to making the model.
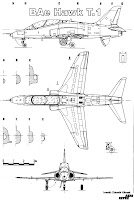
Source: http://richard.ferriere.free.fr/3vues/hawk_1_3v.jpg
Idea Selection & Gathering Images
With further input from other teammates and thinking about the ideas a lot, it has been decided that I will be modelling the third idea of Southend.
Having had awful weather all week, (November is not an ideal time for landscape photography!), it has not been possible to gather primary source photographs for my model. Realistically, the camera angles I will be using will not be achieveable anyway, there's no chance of hiring a helicopter!
Having thought about the idea a lot, I have decided that the way the scenes will be constructed, attention to detail will not be as important as there will be long distance shots, aside from maybe one mid-range shot of the train on the pier (I always overcomplicate things anyway, let's try and keep it simple this time.
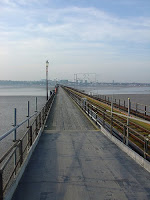
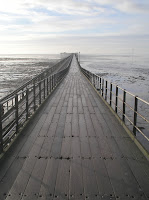
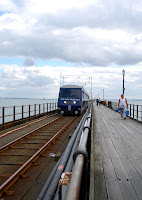
Here are some images of the pier I have gathered:


I plan to model the pier and the trai, and maybe have an image of the park if it is included? Or a low detail animated version of the park's rollercoasters? (As it will be in the distance, will there be any point animating it?)
_________________________________________________________________
Sources:
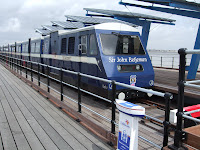
Blue Train: http://www.flickr.com/photos/54238124@N00/3726469436
Blue Train 2: http://sos-uk.blogspot.com/2008_08_24_archive.html
Pier Head: http://commons.wikimedia.org/wiki/File:Pier_Head_stn_%28Southend_Pier%29_look_north.JPG
Foggy Pier: http://upload.wikimedia.org/wikipedia/commons/c/c4/Southend_Pier.jpg
Trains Passing: http://upload.wikimedia.org/wikipedia/en/4/4a/SouthendPier2005.jpg
B&W Trains: http://picasaweb.google.com/lh/photo/eL9XU7O6F3oZaP3U-u8tMg
Long Shot of Pier: http://www.flickr.com/photos/51866091@N00/2496648141/
Having had awful weather all week, (November is not an ideal time for landscape photography!), it has not been possible to gather primary source photographs for my model. Realistically, the camera angles I will be using will not be achieveable anyway, there's no chance of hiring a helicopter!
Having thought about the idea a lot, I have decided that the way the scenes will be constructed, attention to detail will not be as important as there will be long distance shots, aside from maybe one mid-range shot of the train on the pier (I always overcomplicate things anyway, let's try and keep it simple this time.
Here are some images of the pier I have gathered:


I plan to model the pier and the trai, and maybe have an image of the park if it is included? Or a low detail animated version of the park's rollercoasters? (As it will be in the distance, will there be any point animating it?)
_________________________________________________________________
Sources:
Blue Train: http://www.flickr.com/photos/54238124@N00/3726469436
Blue Train 2: http://sos-uk.blogspot.com/2008_08_24_archive.html
Pier Head: http://commons.wikimedia.org/wiki/File:Pier_Head_stn_%28Southend_Pier%29_look_north.JPG
Foggy Pier: http://upload.wikimedia.org/wikipedia/commons/c/c4/Southend_Pier.jpg
Trains Passing: http://upload.wikimedia.org/wikipedia/en/4/4a/SouthendPier2005.jpg
B&W Trains: http://picasaweb.google.com/lh/photo/eL9XU7O6F3oZaP3U-u8tMg
Long Shot of Pier: http://www.flickr.com/photos/51866091@N00/2496648141/
Idea Generating for the model ahead
Having spoken to the group, I have put forward a few ideas for my contribution to the models; we have decided to do one each and link them together in the animation.
The ideas I put forward were:
- Southend's Adventure Island - Firstly the theme park, then just an animated rollercoaster, with perhaps a background image of the rest of the park, this idea was scrapped because the thin pipework and structural mass of the entity would have been inappropriate for the rayfire tool to demolish.
- Tilbury Fort / Coalhouse fort - The interesting shape of Tilbury fort from an elevated view would give a brilliant visual model. However, the fort is quite a 'horizontal' entity and once again would be unsuitable for the rayfire tool. Coalhouse fort, not too far away provides a semi-circular shape and much more vertical depth to the model, but is still not the best option. A feature of this idea which was particularly interesting were the huge cannon like gun emplacements on the top. This would have been good to model.
- Southend Pier - one of my teammates has taken a common interest in this idea especially and suggested that the incorporation of the Southend Air Show would be a good idea. The theme park could be created in low detail for a long distance shot, with the incorporation of the pier and the airshow.
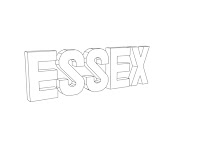
Making it complicated...
Yes, I've been informed that you can do the lettering in a matter of seconds with some creation tools...
Hours wasted... Still, I think the lettering could be beneficial as an alternative font that is not a standard typeface.
Also, since reviewing this post, I have remembered a certain feature of max that would have been easier than the way I did it. You can draw shapes with the pen tool in illustrator and then import them. This could have been done to draw a quick basic shape for the lettering which could then have been extruded.
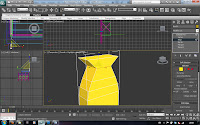
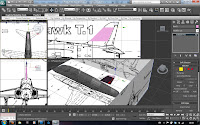
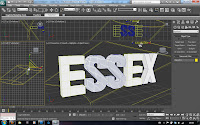
Renders of the Sign
Applying a 20px x 20px white JPG image to the material of each letter gave a white colouring, and then it was just playing around with the rendering...
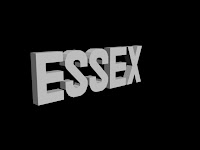
I put a light in the scene to give the letters some shadow, but it still needs some more work. I will report back to the group with this and see if they have any suggestions on how to improve the visibility of the lettering on a white background.


I put a light in the scene to give the letters some shadow, but it still needs some more work. I will report back to the group with this and see if they have any suggestions on how to improve the visibility of the lettering on a white background.


Subscribe to:
Comments (Atom)